Overview
In this tutorial we will cover creating layouts for a blog post, front page blog roll (as a partial), and the main blog page.
(All source code is available at Github )
The Blog Post Page
One of the primary differences between a blog post and a web page is that the post typically displays title of the post and the date posted within the actual content as opposed to in header which usually says something like "Blog". However, we have a minor dilemma because we are populating the page title and tab title from the title attribute.
Given our design, we likely don't want to be adding a new piece of data to all of the web pages just to accommodate the blog post title, so let's add an item to the frontmatter named article_title to contain the title of the blog post, so let's create a directory named articles and make a first test post named first-post.md (Note: the directories could be named anything, and there can be subdirectories under them. The permalink determines where the output file is generated.).
src/articles/first-post.md

---
title: Blog
article_title: First Post
layout: post.njk
permalink: /blog/(( article_title | slugify ))/
---
We are generating the permalink by passing the article title through a filter named slugify that converts all of the letters to lower case and converts spaces to dashes (-). Given the article title above, the permalink would become: /blog/first-post/.
Blog posts also require a date so that the reader has some indication of when the post was created. The date is also needed for the blogrolls so that the posts can be sorted in reverse order to display the most recent post first. Let's add the date item to the frontmatter.
src/articles/first-post.md

---
title: Blog
article_title: First Post
layout: post.njk
permalink: /blog/(( article_title | slugify ))/
date: 2021-03-21
---
Note that the date is entered in the Year-Month-Day format. This is entirely for sorting purposes and any other format will likely not work. Unfortunately, the displayed date will be quite unattractive as it will contain all of the date and time data.

We can remedy that by installing the moment data formatting library.
npm install moment
and adding a custom filter named dateReadableShortDate to our .eleventy.js file.
module.exports = function (eleventyConfig) {
    eleventyConfig.addPassthroughCopy("src/css");
    eleventyConfig.addPassthroughCopy("src/_data");
    eleventyConfig.addPassthroughCopy("src/img");
    eleventyConfig.addPassthroughCopy("src/js");

    // create filter to return short version of date
    eleventyConfig.addFilter('dateReadableShortDate', date => {
        return moment(date).utc().format('MMM D YYYY');
    })

    return {
        dir: {
            input: 'src',
            output: 'dist',
            includes: 'partials_layouts'
        }
    };
};

The ability to add custom filters to the .eleventy.js file opens a virtually unlimited horizon for customization. Note that everything in the .eleventy.js file is written in Javascript and uses the Eleventy APIs.
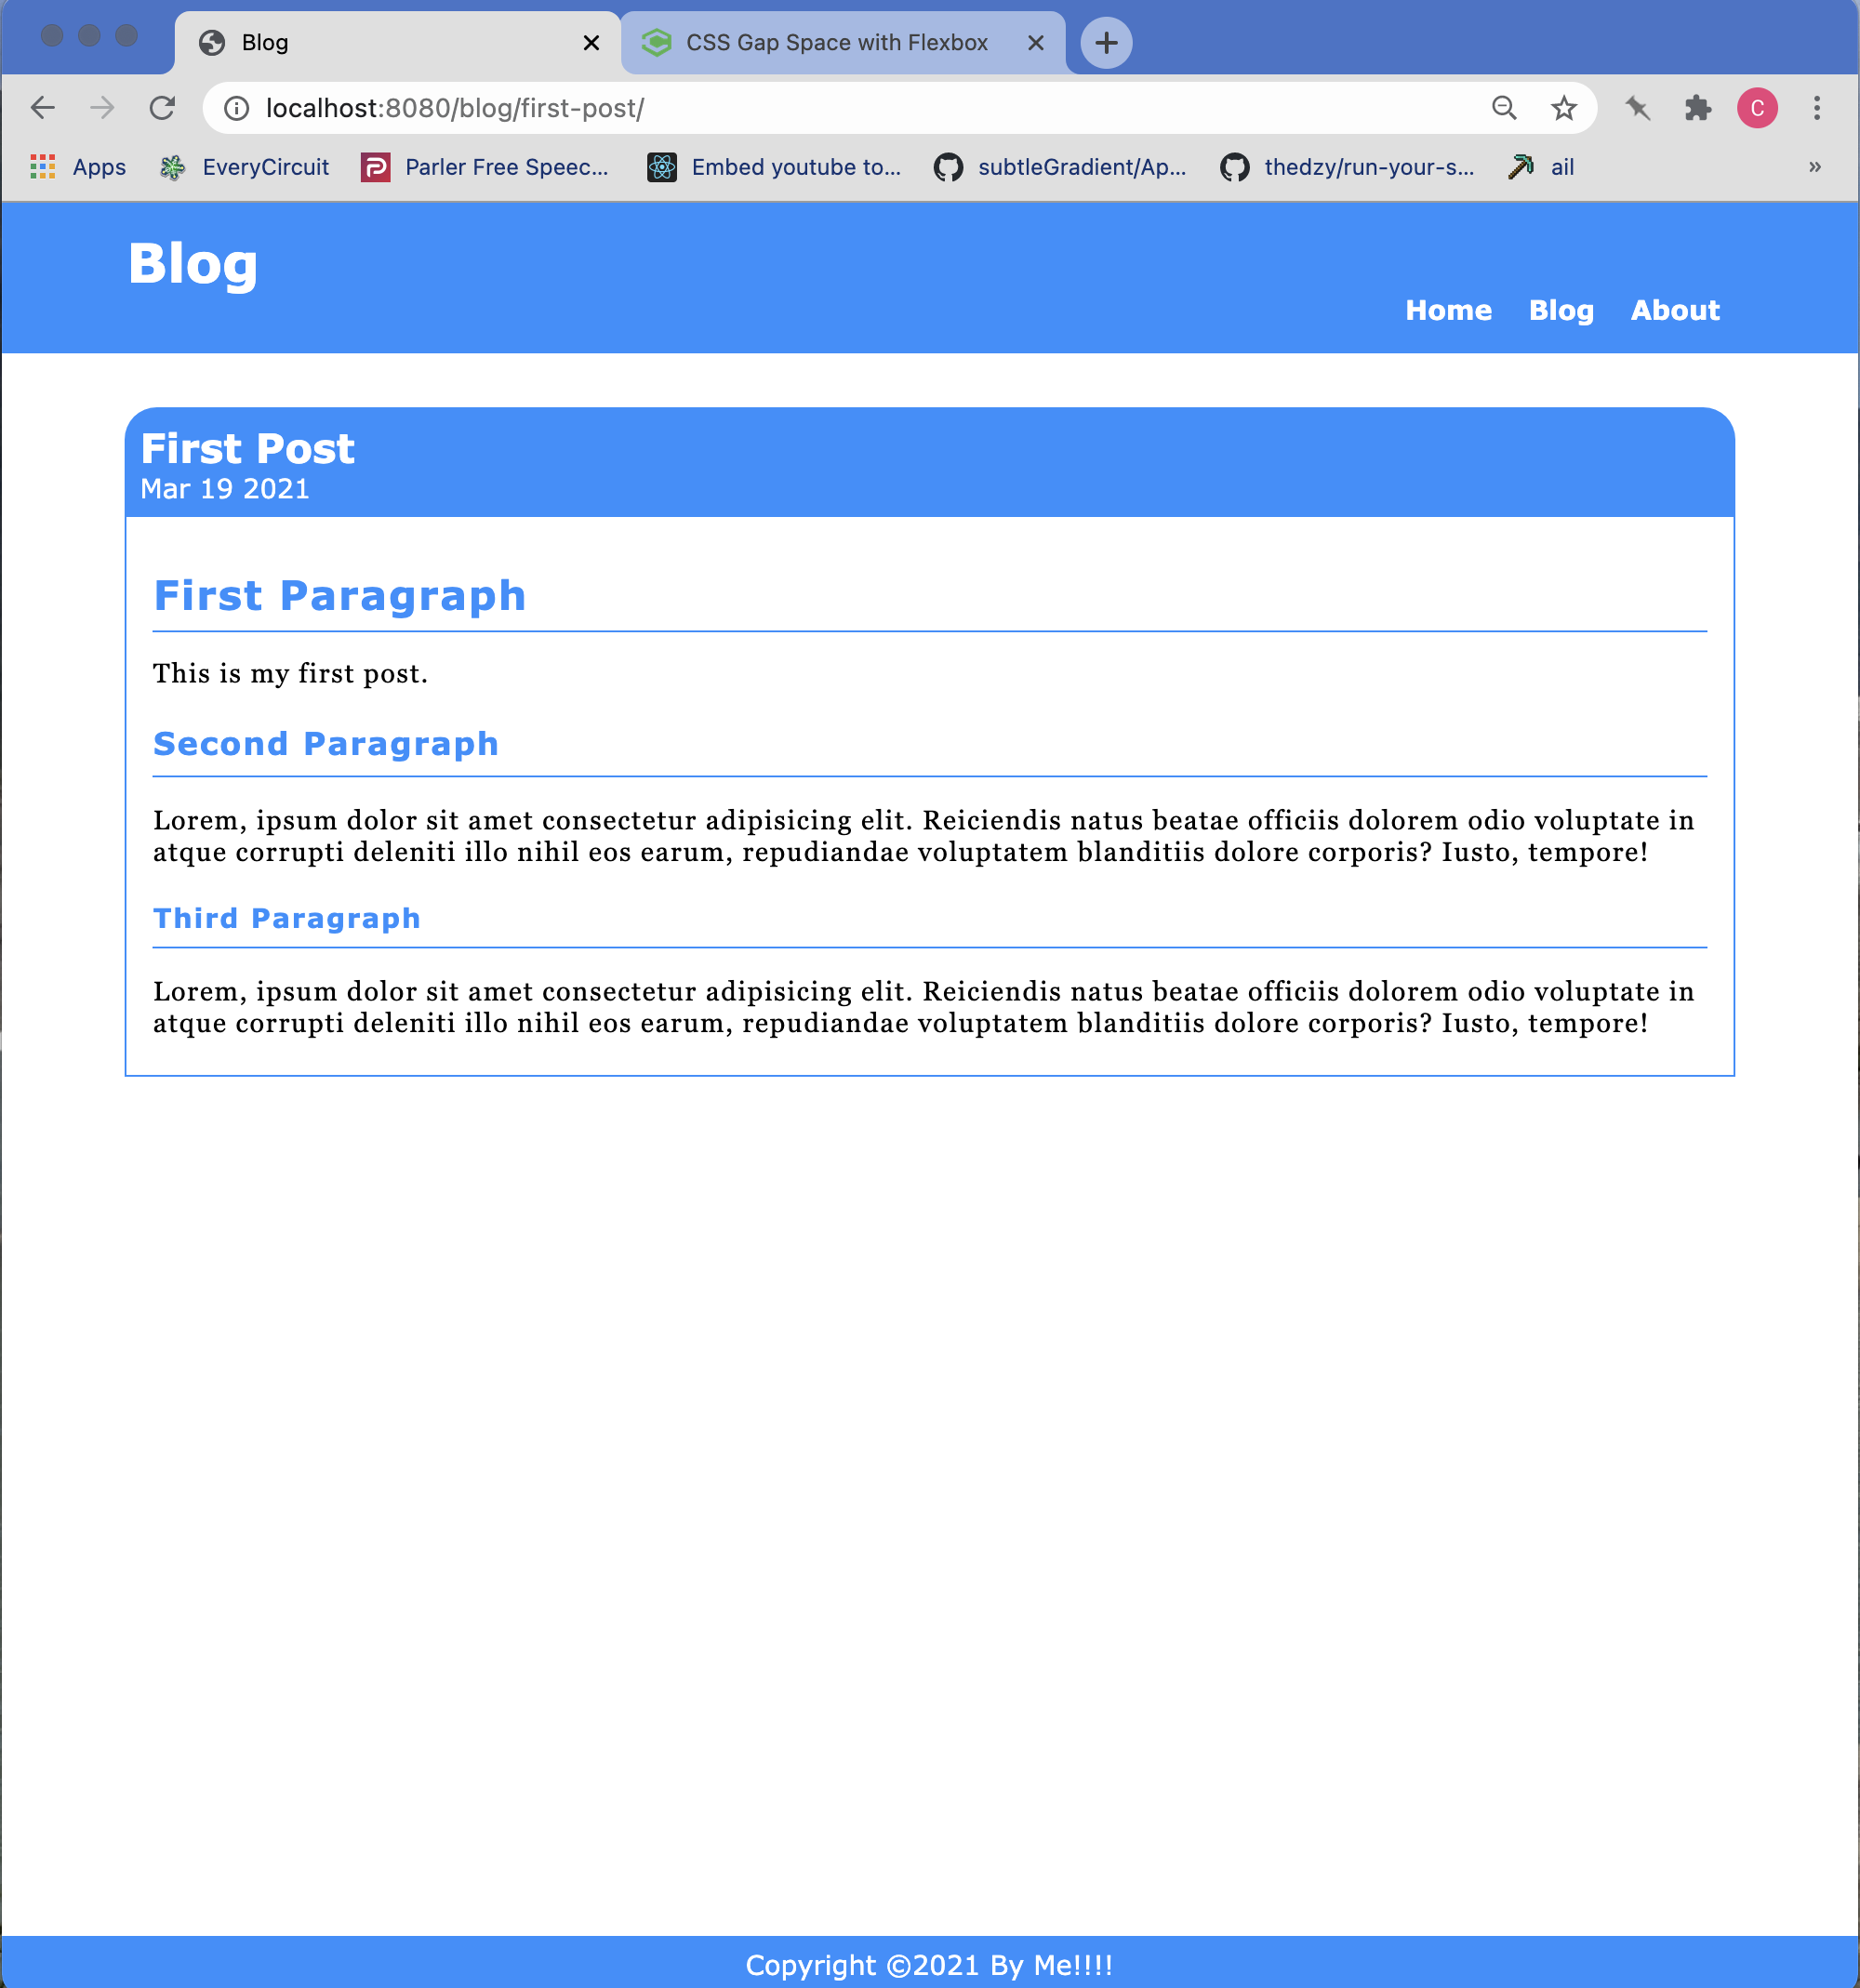
Let's also modify our post.njk layout to provide for some styling by enclosing the article heading and the content in the blog-post-header and blog-content classes respectively:
src/partials_layouts:


{%- include '_head.njk' -%}
<main>
  <div class="blog-post">
    <div class="blog-post-header">
      <h2>{{ article_title }}</h2>
      <date>{{ date | dateReadableShortDate }}</date>
    </div>
    <div class="blog-content">
      {{ content | safe }}
    </div>
  </div>
</main>
{%- include '_foot.njk' -%}
With these additions, we can point our browser to localhost:8080/blog/first-post to see how our post appears (note that additional mock text was added to show headings).
The final step is to add the tags object to the frontmatter so that the posts can be easily accessed by the blogrolls.
/src/articles/first-post.md:


---
title: Blog
article_title: First Post
layout: post.njk
permalink: /blog/{{ article_title | slugify }}/
date: 2021-03-21
tags:
  - posts
---
The Blogroll Page
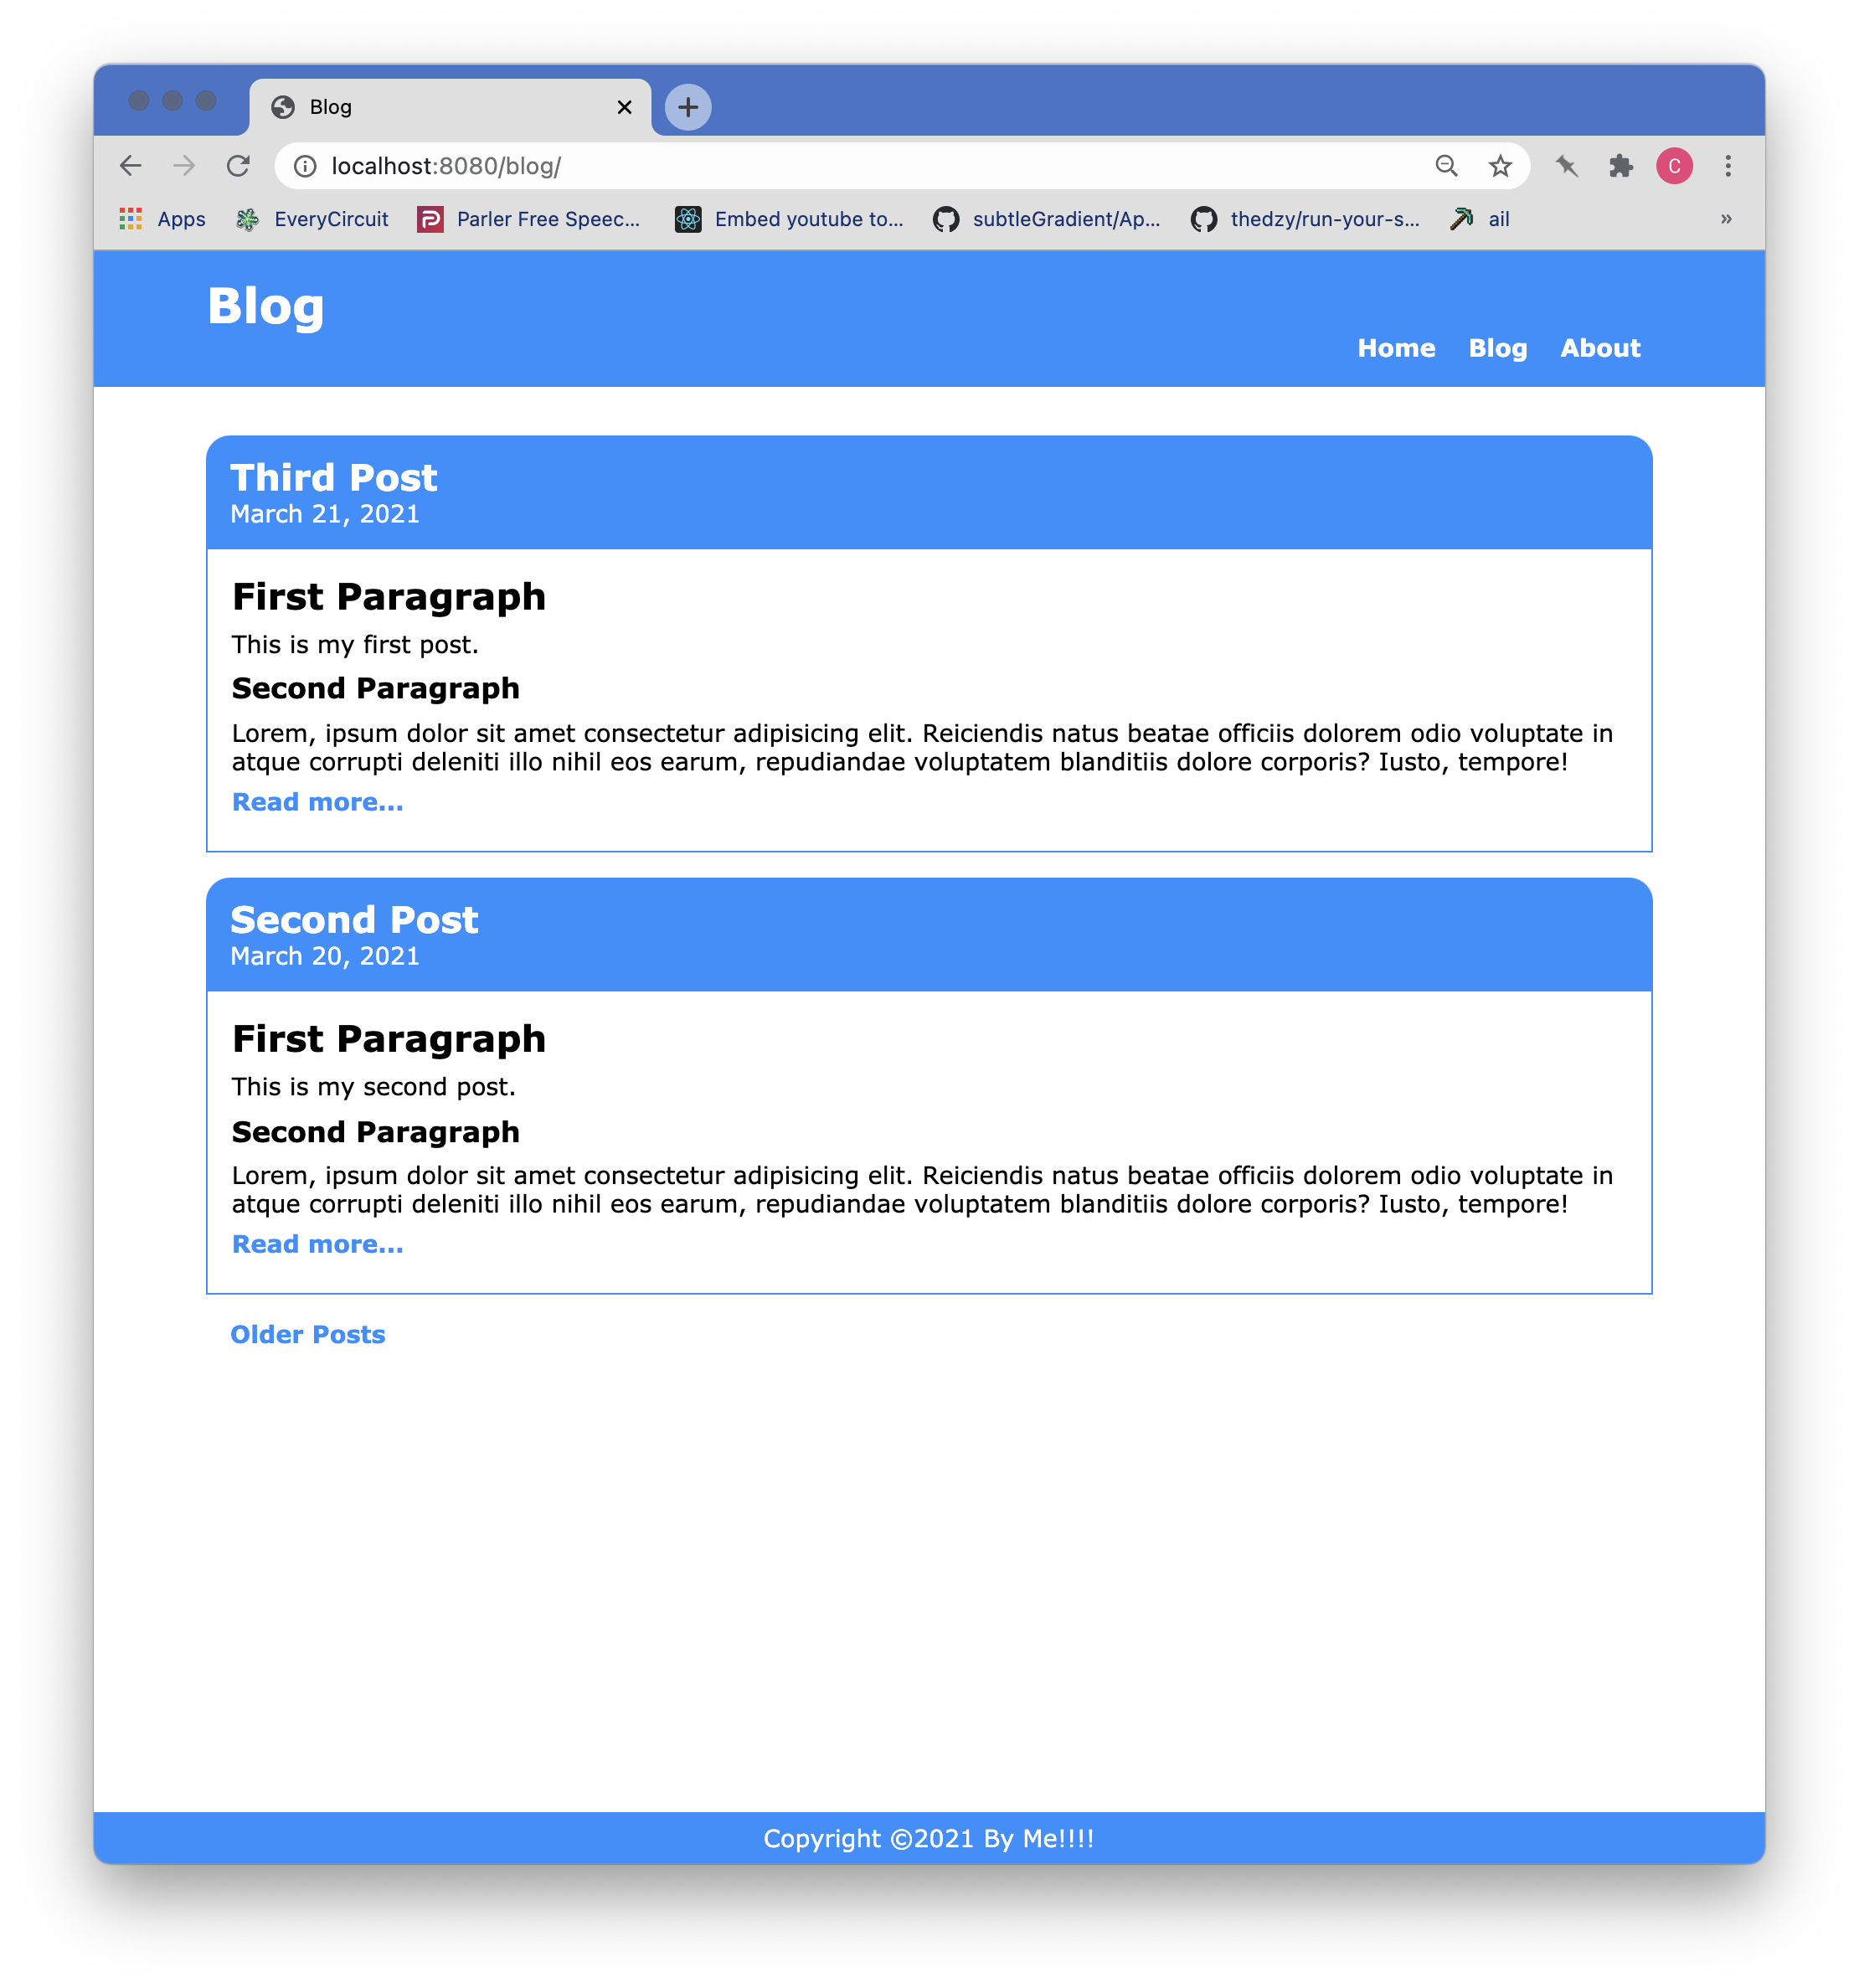
Now we can build the main blogroll page layout. However, there are a few things to consider before diving right into building the layout. The two most popular methods of showing blog posts are the infinite scroll type where a limited number of posts are initially displayed and when you scroll to the bottom of the last one either another group will be appended or you will be presented with a button to load more posts. The other approach is to display a number of posts per page and create a number of pages. Each approach has its advantages and disadvantages. For our purposes, we shall choose the latter to demonstrate the pagination facility that is built into Eleventy.
Before we continue, there are a few other design decisions that need to be accounted for. We can obviously load the entire content of each blog post on the blogroll pages, but that will result in long scroll times. The other options are either to simply display the titles of the posts, or to display the titles of the posts and a short excerpt. We will choose the latter because just showing the title may not be enough.
First let's build the template.
src/partials_layouts/blog.njk

{%- include '_head.njk' -%}
  <div class="blog-container">
    <div class="container">
      <div class="blog-content-container">
        {%-for post in posts -%}
        <article>
          <div class="article-header">
            <h2><a href="{{ post.url | url }}">{{ post.data.article_title }}</a></h2>
            <time datetime="{{ post.date | dateIso }}">{{ post.date | dateReadable }}</time>
          </div>
          <div class="article-body">

            {% excerpt post %}

            <p class="text-right read-more-link">
            <a href="{{ post.url | url}}">Read more...</a>
            </p>
          </div>
        </article>
        {%-endfor -%}
      {%- if pagination.href.previous or pagination.href.next -%}
    <div class="page-nav center-div">
        <ul>
            <li>{%-if pagination.href.previous -%}<a href="{{ pagination.href.previous }}">Newer Posts</a>{%-endif -%}</li>

            <li>{%-if pagination.href.next -%}<a href="{{ pagination.href.next }}">Older Posts</a>{%-endif -%}</li>
        </ul>
    {% endif %}
    </div>
      </div> <!-- blog content container -->
    </div> <!-- container -->
  </div> <!-- blog container -->
  {%- include '_foot.njk' -%}
The first two divs will allow us to control the width of the blogroll content and center it. We can go back to modify the post.njk and page.njk files to do the same, but that's a clean up task. As you can see we have a two new filters named dateIso and dateReadable. We also have a new shortcode named excerpt[1] that will need to be created. A shortcode is essentially a kind of function or method.
Adding these new features to our .eleventy.js configuration results in:
.eleventy.js
const moment = require('moment');

module.exports = function (eleventyConfig) {
    eleventyConfig.addPassthroughCopy("src/css");
    eleventyConfig.addPassthroughCopy("src/_data");
    eleventyConfig.addPassthroughCopy("src/img");
    eleventyConfig.addPassthroughCopy("src/js");

    //------------ Date Filters ------------------------------
    // create filter to return short version of date
    eleventyConfig.addFilter('dateReadableShortDate', date => {
        return moment(date).utc().format('MMM D YYYY');
    })

    // create a filter to return a readable version of the date (blog posts)
    eleventyConfig.addFilter('dateReadable', date => {
        return moment(date).utc().format('LL');
    });

    // create a filter to return the ISO version of the date  (Year-Month-Day)
    eleventyConfig.addFilter('dateIso', date => {
        return moment(date).toISOString();
    });

    // excerpt shortcode
    eleventyConfig.addShortcode('excerpt', article => extractExcerpt(article));

    return {
        dir: {
            input: 'src',
            output: 'dist',
            includes: 'partials_layouts'
        }
    };
};

// method to extract an excerpt
function extractExcerpt(article) {
    if (!article.hasOwnProperty('templateContent')) {
        console.warn('Failed to extract excerpt: Document has no property "templateContent".');
        return null;
    }

    let excerpt = null;
    const content = article.templateContent;

    // The start and end separators to try and match to extract the excerpt
    const separatorsList = [
        { start: '<!-- Excerpt Start -->', end: '<!-- Excerpt End -->' },
        { start: '<p>', end: '</p>' }
    ];

    separatorsList.some(separators => {
        const startPosition = content.indexOf(separators.start);

        // This end position could use "lastIndexOf" to return all
        // the paragraphs rather than just the first paragraph when
        // matching is on "<p>" and "</p>".
        const endPosition = content.indexOf(separators.end);

        if (startPosition !== -1 && endPosition !== -1) {
            excerpt = content.substring(startPosition + separators.start.length, endPosition).trim();
            return true;
        }

    });

    return excerpt;
}
The next step is to create the blogroll page:
---
title: Blog
layout: blog.njk
permalink: "/{{ title | slugify }}/{% if pagination.pageNumber > 0 %}{{ pagination.pageNumber | plus 1 }}/{% endif %}index.html"
pagination:
  data: collections.post
  size: 4
  reverse: true
  alias: posts

---
There are several things to understand here so let's begin with the permalink. The permalink takes advantage of the Eleventy pagination object to generate multiple pages with a set of blog post excerpts on each page. The first page will be generated in the /blog/ folder as index.html. This page is nominally page 1, but Eleventy uses zero-based counters hence the need to add 1 if the pageNumber is greater than zero. If you look in the /dist folder, you will see additional folders that number from 2 upwards, each of which contains its own index.html.
The next item to consider is the pagination object. The Eleventy pagination objects provides the capability to group a collection and provide both previous and next pages for the groups. The pagination object above uses four parameters:
- data - the source of the data
- size - The number of items per page
- reverse - Sort in reverse date order
- alias - short name for the collection
The first Nunjucks directive under the blog-content-container div is a for loop that iterates over the posts collection using the alias, posts. It then uses data from the retrieved post to dipsplay the article title and the date of the post. The excerpt shortcode is then used to grab an excerpt from the post text. Following the excerpt is a Read more... link that takes the user to the full blog post.
Towards the bottom in the page-nav div the pagination previous/next data items are checked to determine if there and any older or newer posts and provides those links as necessary. That all being said, you should be seeing a blog page that looks like this:
Home Page Blogroll Component
The last part of this tutorial will focus on creating a blogroll partial to display on the home page. As with the Blog Roll page, we are choosing to limit the number of posts to appear and supply a link at the bottom that takes the user to the blog's first page.
Let's look at the code for this partial:
/src/partials_layouts/_blogroll.njk
<div class="blogroll">
<div class="blogroll-container">
{%- set newposts = collections.posts | reverse -%}
{%- set newposts = newposts.slice(0,3) -%}
{%- for post in newposts -%}
<article>
<div class="article-header">
<h2><a href="{{ post.url |url }}">{{ post.data.article_title }}</a></h2>
<div class="blog-timestamp">
<p>
<time datetime="{{ post.date | dateIso }}">{{ post.date | dateReadable }}</time>
By {{ post.data.author }}
</p>
</div>
</div>
<div class="blogroll-content-body">
{%-excerpt post -%}
<p class="read-more">
<a href="{{ post.url | url }}">Read more...</a>
</p>
</div>
</article>
{%-endfor -%}
<p>
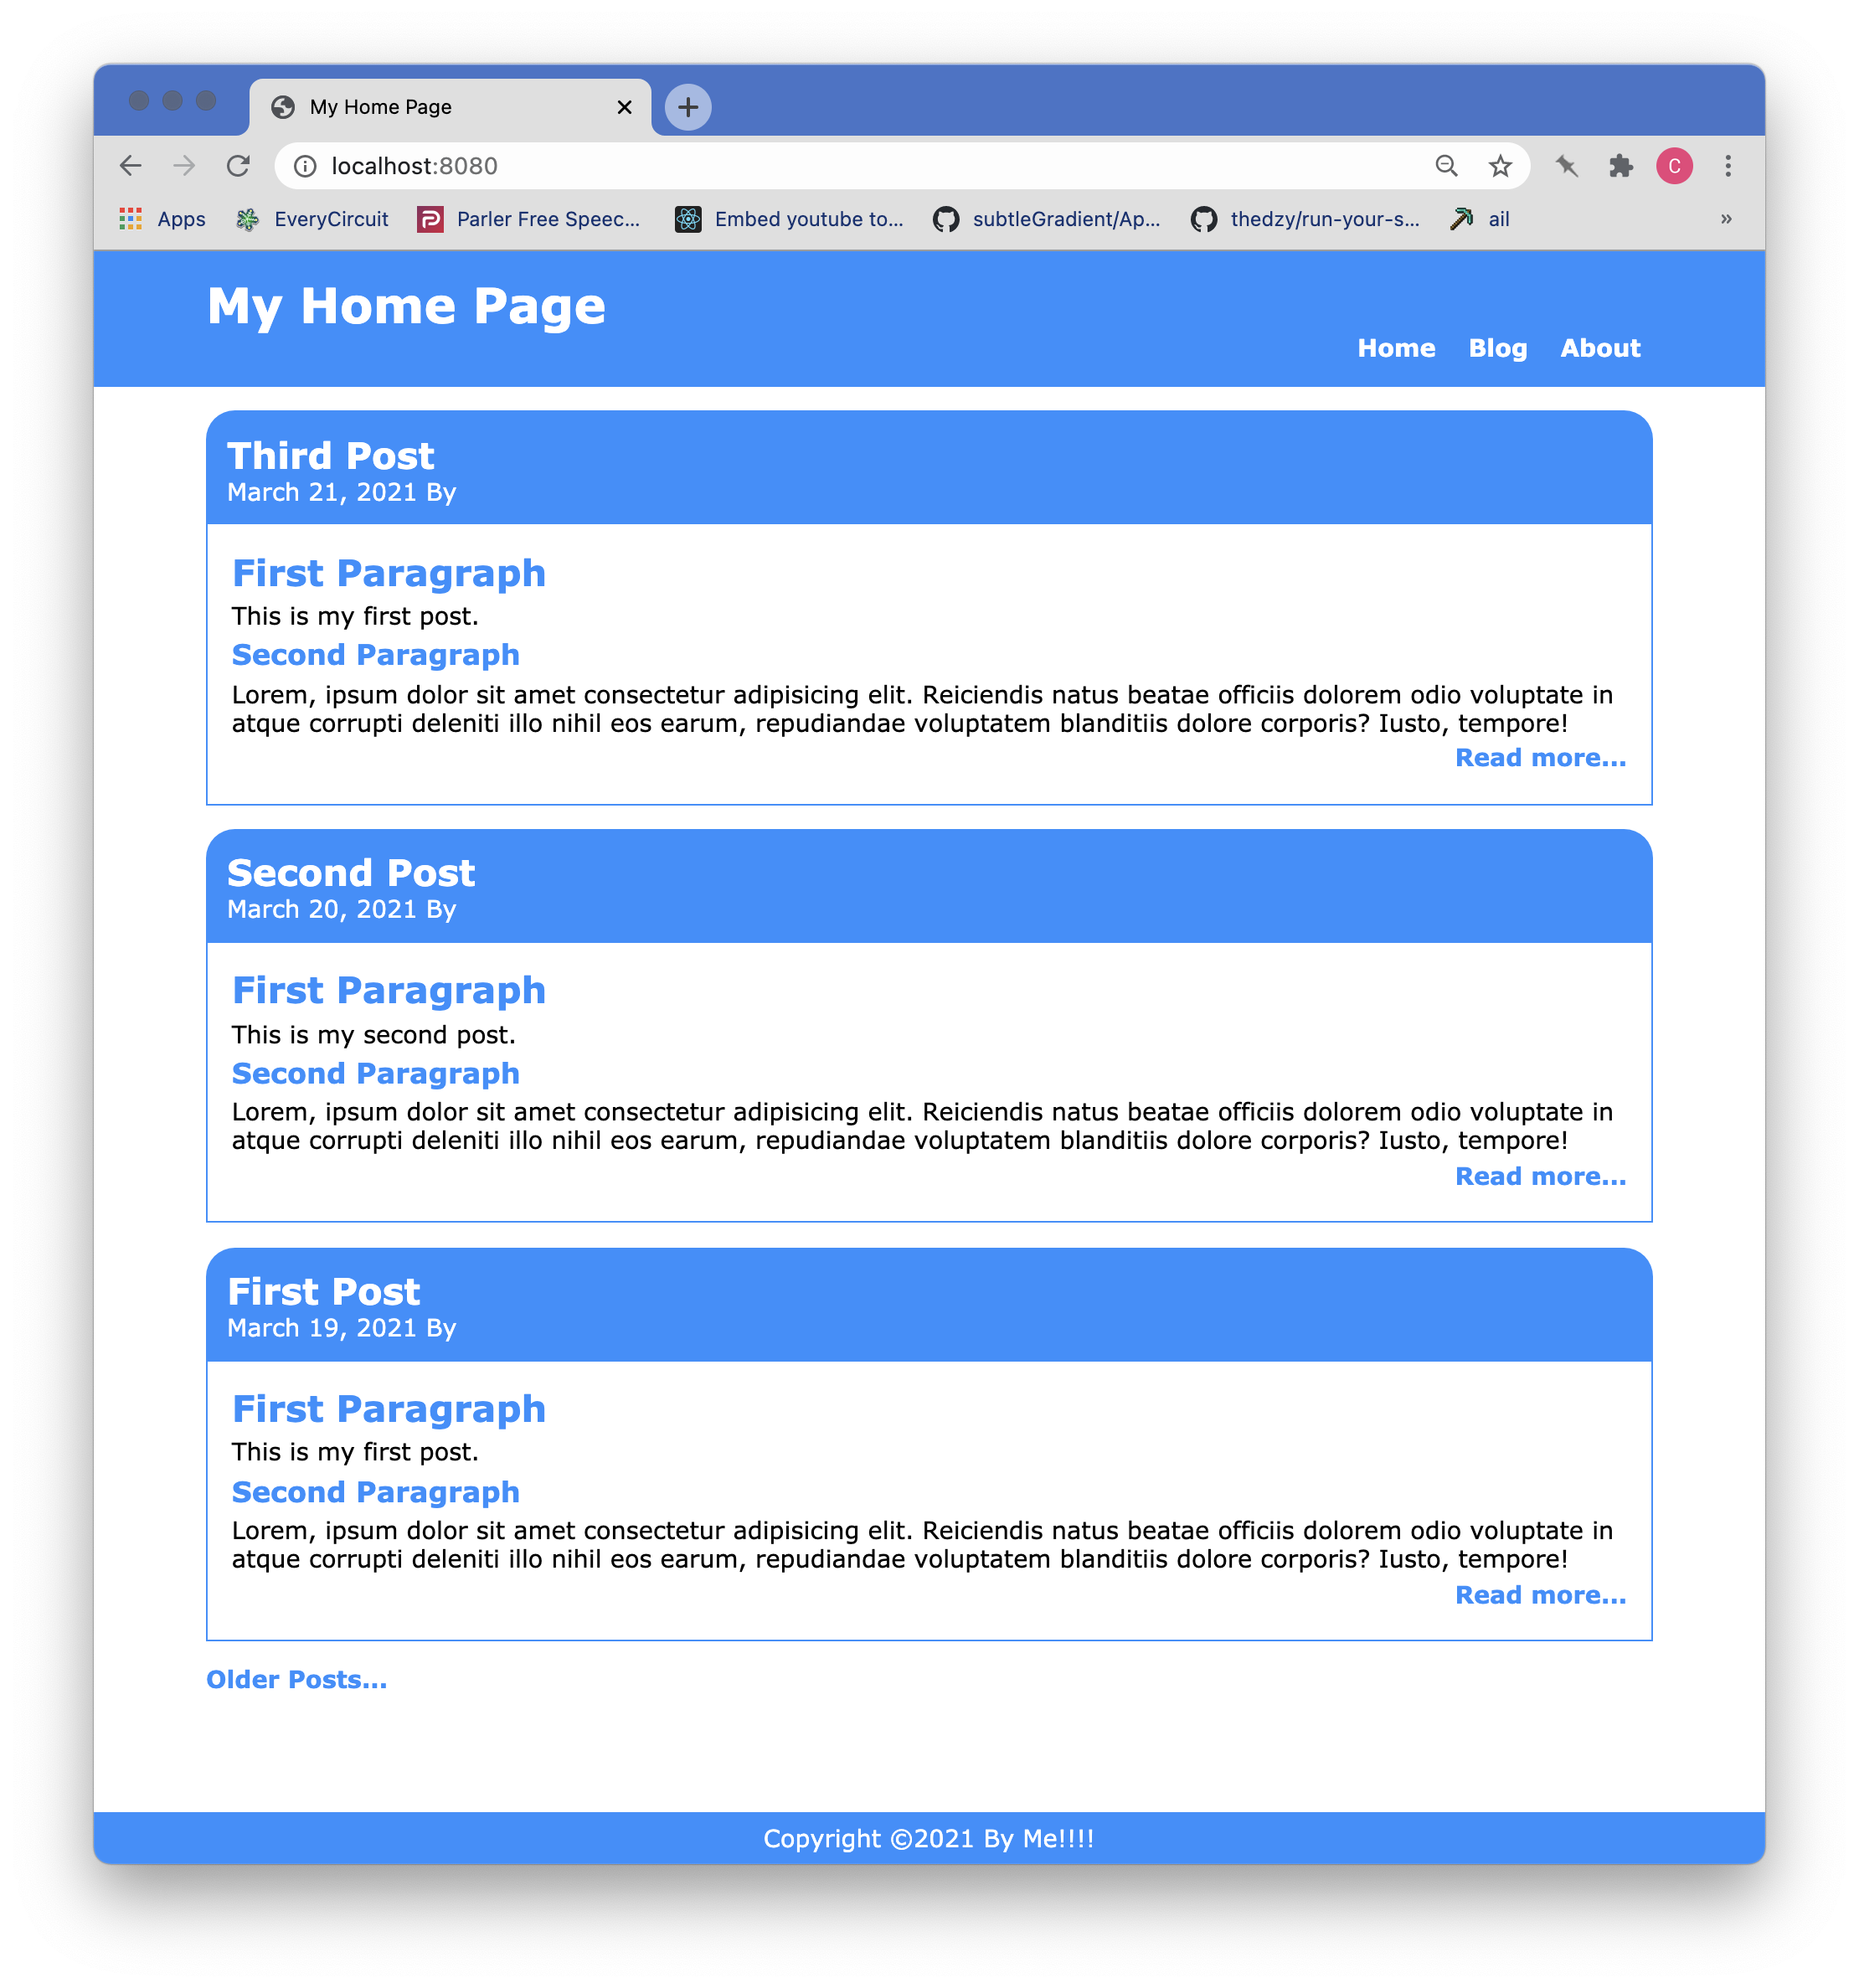
<a href="/blog/">Older Posts...</a>
</p>
</div>
</div>
In the listing above, you can see that we are declaring the variable newposts and assigning it the result of filtering the collections through a reverse sort by date filter. After that, we are pruning the newposts variable down to the latest three posts by using the slice operator from Nunjucks. Following that we iterate over the remainings posts in the same fashion used in the blogroll page.
With this final component in place, we now have a home page that updates whenever a new post is added.
UPDATE The site was restyled for a better appearance and the stylesheet updates are in the repo.
Wrap Up
That about wraps up this tutorial on blog posts, blog rolls, and the home page blogroll partial. This is currently the last of the tutorials on getting started with Eleventy, but I encourage you to continue experimenting and pushing the boundaries.
[1] dateISO, dateReadable, dateReadableShortDate, and excerpt shortcode from Creating a Blog With Eleventy [↩]